Mk2.5 engine progress

The crank pulley bolt was the target of today. I borrowed an electric impact gun from a fellow Westfield owner and set to work. This one apparently turns out a maximum of 450nm (331 lb/ft) and as the bolt should have been torqued to 116-122lb/ft (apologies for mixing my units) it shouldn’t have presented a problem. Of course, you knew where this was going and the bolt did indeed stay put. Lots of orange dust, but not movement on the bolt. I gave it a soaking in penetrating fluid and got to work again but still with no joy. I sprayed on some more fluid then whilst it was doing it’s thing consulted the internet to see if it was a left handed thread or something. I was sure I’d have remembered if it was, but it just didn’t make sense why the bolt still wasn’t moving.

After confirming that there was nothing unusual about the thread, I gave it another go. Still no movement… Even extended goes of 30 seconds or so only produced a ringing in my ears. I was just about to give up when I noticed at the end of the go there may have been slight movement in the bolt. It could also just have been the crank turning a little bit (though I had locked it off), but gave it another attempt just in case. Nothing for the first few seconds, then it started to move again and off it came. Phew! With the bolt removed I could also dispatch the crank drive belt pulley, crank cambelt pulley and the lower cambelt cover.

Crank pulley bolt removed

I was quite surprised to see the oil seal wasn’t leaking. I should probably replace it anyway, of course.

Next up I tackled a spare bracket that I wouldn’t need – I think it’s the air con pump bracket.

Air con pump bracket

This only had one bolt left holding it on… which wasn’t particularly easy to get to.

OLYMPUS DIGITAL CAMERA

It was hidden behind this bit sticking out here, but unfortunately you couldn’t get an open ended spanner on it either because of the rest of the bracket.

Air con bracket bolt

I had a look in the manual to see how it was removed but the car they used didn’t have air con. It looked like the bit covering it was pressed into the bracket and could possibly have been drifted back out. Unfortunately due to the front of the bracket I couldn’t get a punch straight on there so couldn’t use too much force.

Then I noticed that as that was the only bolt left, the whole bracket could pivot on it. It wasn’t particularly professional, but I just tapped the front of the bracket with a hammer until it had rotated enough to get a spanner on it. Whilst I was doing this, the bolt lost whatever friction was holding it in so rotating the bracket back and forth soon became enough to undo the bolt by hand. Not particularly elegant, but surprisingly effective!

Air con bracket removed

Last to come out was the waterpump. It wasn’t leaking but I remember how much of a pain it was changing it on the original MX5 – much easier to do with the engine out of the car. Only 4 bolts holding that bad boy on.

Water pump removed

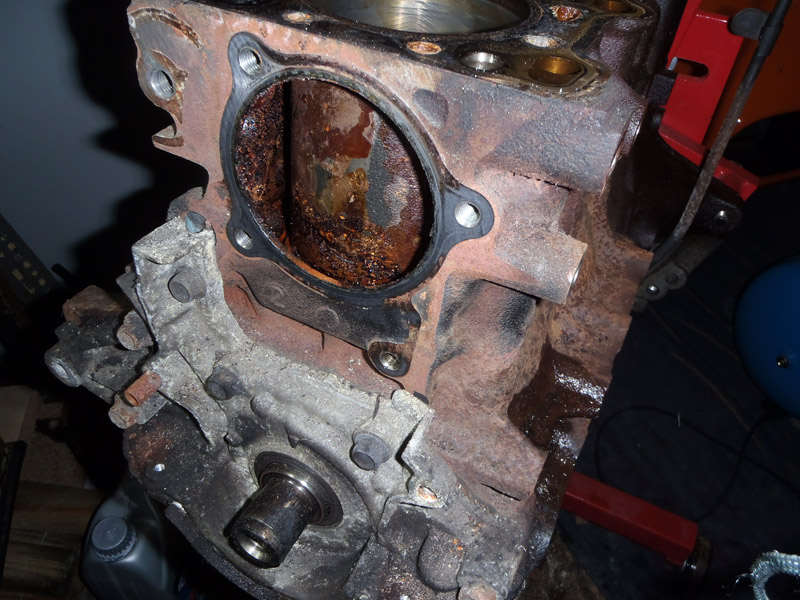
Not that pretty in there – looks like someone may have used plain water at some point. Coupled with that and the headgasket failure I’ll be sure to give it all a good flushing anyway.

So I now need to reconsider my plans for this engine. Originally, I just wanted to bolt the top half of the mk2 engine onto the bottom half of the mk2.5, and it was supposed to be a relatively cheap project. However, whilst I’m here it would make sense to rebuild the engine to ensure longetivity in the long run. And whilst you’re at it, what parts could be upgraded… then balance all that against the fact that MX5 engines are pretty cheap so there’s a strong argument for sticking with the original plan. If something goes wrong it’s not going to be that difficult to build again. I suspect I’ll just carry on with gasket replacement, but part of me thinks it would be nice to get the block decked to increase the compression ratio a bit… whilst I’m here…

Posted in Performance upgrades | 1 Comment

Bit more progress on the new engine

Surprisingly I managed to find a bit more time yesterday. Not much, but enough to get a bit more done. First, I flipped the mk2.5 head over and had a look at the gasket.

Mk2.5 head

That’s cylinder 4 looking pretty wet there! The obvious failure with the head gasket matches up with the fluids seen on the block earlier.

Never matter… I decided to pay some attention to the Mk2 engine instead. Not a lot of space where it is, but as I’m only interested in removing the head from it I’m not convinced I need any more.

Mk2 engine

After removing the seat belts that must have been used to lift it out of the car, I set to work removing the inlet manifold. I’d not done this on a mk2 engine before, so rather than looking for the easiest way I just decided to split the inlet manifold and see what that showed. That wasn’t particularly difficult – just a few bolts, brackets at the throttle body. This then gave lots of space to remove the fuel rail, then the bottom half of the inlet manifold.

With that little lot out of the way, I decided to offer up the throttle bodies manifold. As with the Mk2.5 engine, this didn’t fit either.

DanST Inlet Manifold

It can’t be the studs that are bent then and must be the holes on the flange not being quite right. Lining it up with the gasket and it does appear the bottom holes may be ever so slightly out of alignment, but that may not be enough to matter. I’m going to dig out an 8mm drill bit, just in case the holes are misshapen slightly.

Posted in Performance upgrades | Leave a comment

Mk2.5 engine – head removed

I didn’t manage to find any time over Christmas, but have managed a couple of hours today. I set myself a target of removing the head from the mk2.5 engine (which I only want the block from) and got going. For this, I’d need to get around the front of the engine. Unfortunately, I’m at a ‘space critical’ time in the garage where I’ve filled it full of so much stuff it’s like one of those picture puzzles trying to work in the area you want. Think I need to invest in more sheddage to get the garden stuff out! Anyway, a quick game of tetris later and I had the space I needed.

Front of mk2.5 engine

I carried on methodically removing the pipes, brackets and covers until I had the access I needed. This time round, I’m putting all the bolts in sandwich bags and labelling what they’re for. I wish I’d done that with the previous engine instead of putting them in a container thinking it’ll be easy to work out what is for what!

As per last time, I got stuck with the crank pulley. The 10mm bolts were easy enough to remove, but the pulley was staying put. The crank nut itself has also not managed to magically free itself. The air impact gun I’ve robbed from my brother doesn’t seem to be man enough to do the job anymore. I’m not convinced it’s the gun itself, more that there is too much hose between it and the compressor and perhaps the mini oiler is leaking. I’m going to get a new short hose and set it up like it was when it easily removed the last crank nut.

Still, that was a job for another day so for now I just removed the cam belt tensioner and pulled the belt off that way. Removing the head from there was a standard affair with the only oddity being that one of the head bolts had two washers instead of one. I can’t remember is this was the same for the old engine or not. Will check when I remove the head from the mk2 engine.

Whilst removing the spark plugs I noticed that the one of cylinder 4 was wet with oil. This seemed a bit odd as it’s usually the valve cover leaking that does that. However, the spark plug hole was completely dry. I therefore expected to see that the head gasket was broken and lo and behold…

Mk2.5 head off

Closer inspection…

Cylinder 4 close Cylinder 4 closer

Shame really, as I bought the engine as a working engine not one with a blown head gasket. That’s far too far down the road to care about or bother with now though. All it means is I’ll have to check the block for trueness just in case it has overheated. Worst case – I’ll remove the crank like I was originally going to do and get the block decked. Cross that bridge when I get to it.

I’ve provisionally got Thursday off work so I’ll try and make more progress then. Maybe a tip run to try and get some more space to work around!

Posted in Performance upgrades | Leave a comment

Engine build – inlet manifold test fitting

Firstly, I’m aware that I’ve not posted an update on September’s track day. Suffice to say, the tyres were great and a whole lot of fun was had! I want to be able to show videos of laps with the R888s along side previous laps to make decent comparisons… but for that I need better video editing software than Windows Movie Maker. And really, that warrants a better PC than the one I’m using. As a comparison though, last September’s fastest time was 1:41.470. This year, on the R888s it was 1:39.1… and I’m not convinced I’m a better driver! Maybe slightly, but that’s what I want to see with side-by-side videos.

Anyway, back to this engine build. Not a lot has happened since last time. The garage is too full of gardening junk accumulated over the summer so working on the engine isn’t too comfortable. I’ve managed to clear a bit out though and am trying to get back into the swing of things. To add a bit of momentum, I’ve ordered the inlet manifold necessary to marry up the GSXR throttle bodies with a mk2 head (courtesy of DanST Engineering). That arrived yesterday, so I set aside a few minutes in the garage this morning.

I flipped the engine back over and set to work dismantling the rest of the inlet side. Pretty simple affair involving the removal of the oil cooler coolant pipes, the oil pressure switch (and associated take off for the VVT solenoid) and the knock sensor.

Inlet side

With that done, I unpacked the inlet manifold.

GSXR MX5 Inlet Manifold

As the throttle bodies are in pairs on not individually, they can only be spaced in the middle. Naturally, this isn’t ideal but by making the intake lengths equal we can minimise the negatives. Looking inside it is all nice and smooth – DanST Engineering have done a good job here.

GSXR MX5 Inlet Manifold inside

Despite still have the wrong head fitted (Mk2.5 not Mk2), I couldn’t resist cheekily offering it up.

Inlet manifold fitting

Unfortunately, it only went on that far. All the holes are in the right place, it just looks like they need opening up slightly. I’ve emailed DanST just to check.

It’ll be nice to find some time over Christmas to finish this build off. If I can get the engine done and dusted in January, then the ECU fitted and mapped in February that’s plenty of spare time before track day season starts again.

Posted in Performance upgrades | Leave a comment

New shoes – 14″ R888

Whilst at the Abingdon track day back in July I went out in a friends Vauxhall powered Westfield. Surprisingly, it wasn’t the 220+bhp that got me, I suppose I was expecting that. It was how much harder he could brake and turn in. His Westfield was shod in Yokohama A048s, so I made a decision that tyres was going to have to go on the upgrade list at some point. My current Yokohoma Parada tyres are wearing very well, and now that the tread is slightly shallower I find them much more predictable, if still lacking in outright grip it appeared.

Fortunately, I didn’t have to decide what to replace them with as some R888s on 14s appeared on the Mazda forum for a good price so I snapped them up. Without having to do track day duties, my current tyres will last until age kills them rather than a lack of tread I suspect.

The R888s were based down near the south coast, just 11 miles from where I was going on holiday. Fortunately the guy said he’d keep them aside for me, and now that I’m back, here they are.

OLYMPUS DIGITAL CAMERA OLYMPUS DIGITAL CAMERA OLYMPUS DIGITAL CAMERAThere is very little wear on the tyres, and whilst the wheels aren’t perfect they’re all round. They come in at twelve and a half kilos each, so around one kilo less than the current wheels.

OLYMPUS DIGITAL CAMERAI test fitted them to the front first and they seem ok. Obviously they don’t fill the arches, they’re only 185s. It’s surprising how much difference that 10mm makes though. This is the 195 for comparison.

OLYMPUS DIGITAL CAMERAPerhaps also exasperated that the cycle wing stays were bent to match those wheels which will be why it comes to the edge nicely. Still a big gap on the inside of course!

The rears are much more obvious…

OLYMPUS DIGITAL CAMERAThey look somewhat lost! Perhaps a different set of wheels with a lower offset would be better. Ah well, can’t see it whilst I’m driving it, and they are only track day wheels after all. Here’s the ‘top shots’ for comparison.

OLYMPUS DIGITAL CAMERA OLYMPUS DIGITAL CAMERANext track day is on the 12th September, so looking forward to seeing how they perform. Will hopefully get some road miles under the belt before then too, though as I never pushed the normal tyres on the road I shouldn’t really notice any difference.


Posted in Performance upgrades | Leave a comment