Dilemma – to use the MSBP or not

One of the benefits of using a mk2.5 block over a mk1 or mk2 is that it comes with a Main Bearing Support Plate (MSBP). Essentially this is an uprated windage tray that sits between the sump and the block. Here it is:

OLYMPUS DIGITAL CAMERA OLYMPUS DIGITAL CAMERA

So, rather than just bolt at the edges, this one also bolts into the main bearing caps (4 of them anyway). This is supposed to reduce flex at high rpms. I suppose, given that this engine will rev higher than the mk1, this is a good thing.

However, it won’t fit a mk1 or mk2 sump. Here’s my mk1 sump… and I apologise for the mess. It looks like when it was fitted most of the world’s supply of RTV sealant was also used. I’d scraped it off to help the photos but not cleared it from the inside of the sump yet.

OLYMPUS DIGITAL CAMERA

This has got the cut outs for the standard windage tray to sit into. The standard windage tray only occupies 3/4 of the length of the sump, where as the MBSP goes all around it to the moon gaskets. So, if I were to fit it like that, the sump would be the thickness of the MBSP plate too low, and there’d be a gap!

OLYMPUS DIGITAL CAMERA

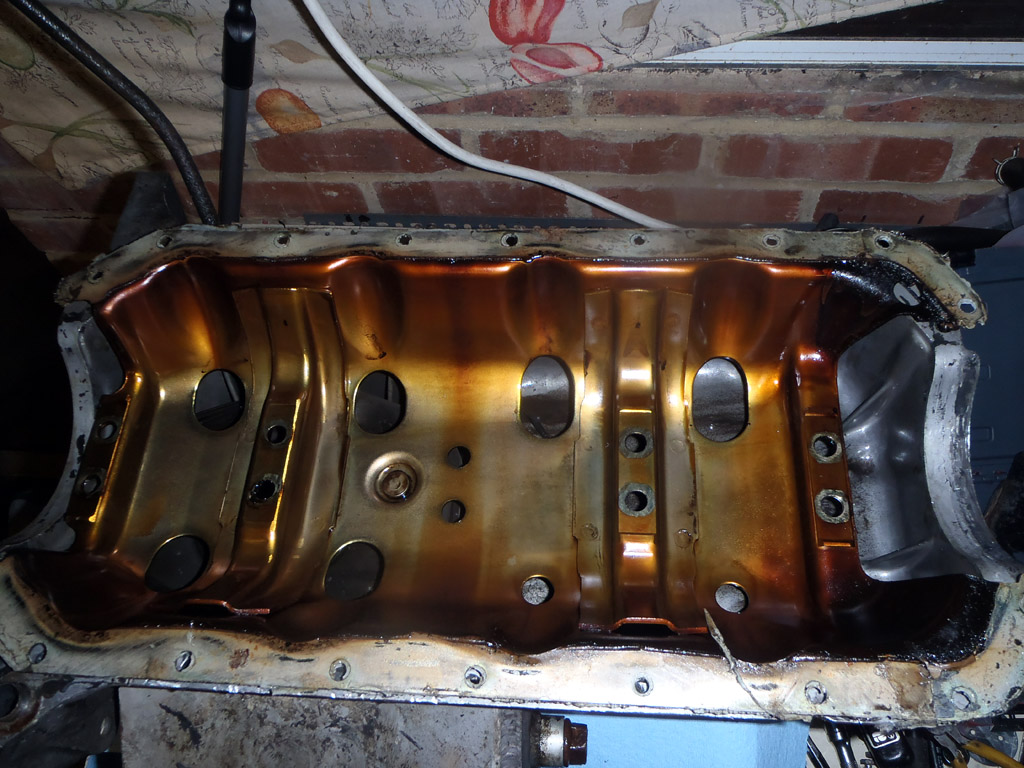
Of course, there’s another problem too. The ‘dimples’ for the crank counterbalances don’t fit inside a mk1 sump.

OLYMPUS DIGITAL CAMERA

So, I’m left with a decision. Park the MSBP on a shelf and use the normal windage tray, or modify the windage tray and sump to fit. Of course, this isn’t a problem for the MX5 guys as they could just use the mk2.5 sump. However, I’d need to modify that and the guy that did my sump has already said he won’t be doing another.

Modifications required to my sump would essentially be machining the face of the sump down by the thickness of the MBSP. I’d then need to cut out the dimples on the MBSP itself.

Fortunately, it’s not a decision I have to make right away, but I suspect I’ll need to have made it in the next couple of weeks.

Posted in Performance upgrades, Problems | Tagged , , | Leave a comment

Head painted

After more masking than the block required, I got the head painted today. I’ve not taken any step-by-step photos though, largely because it appears very similar from when the primer is finished to when the clear coat is applied.

OLYMPUS DIGITAL CAMERA

In between coats, I also managed to strip some of the bits I need from the current engine:

  • Sump
  • Oil pickup
  • Coil pack
  • HT leads
  • Thermostat housing
  • Water pump inlet
  • Fuel rail + injectors

Some assembly lube should arrive this week so I hope I can get cracking on putting this all together soon. Hope I haven’t lost any bits…

Posted in Performance upgrades | Leave a comment

Engine is back – painting

Picked up the block and head this morning after having the faces skimmed just to ensure they were true. No significant amount of meat removed. Probably missed an opportunity there.

Whilst they were at the machinists (Paul Gardias Engine Services), they were also treated to a nice bath, which saves me the job of cleaning them before painting.

The weather is warm and dry today so I wanted to get cracking with that painting. When I got home, it wasn’t looking like it would stay so dry. Just in case, I emptied out a storage unit and converted it into a makeshift spraying cabinet.

By the time I’d finished that of course it was bright and sunny! Next, I inspected the block.

OLYMPUS DIGITAL CAMERA OLYMPUS DIGITAL CAMERA

Obviously, the block wasn’t coming up shiny any time soon, but the grease is off and looks to be an adequate surface to paint on. It also looks to have had a new core plug fitted. Don’t know if this was by Paul or not. I’ve not got any photos of that area to check what it looked like before, but don’t think I noticed it being corroded or leaking. Perhaps Paul needed to remove it when putting it in the bath (I’m sure there’s a proper name for it).

OLYMPUS DIGITAL CAMERA

The face of the block is now nice and flat and smooth so shouldn’t have any headgasket issues. I really hope not anyway.

OLYMPUS DIGITAL CAMERA

The bottom of the block:

OLYMPUS DIGITAL CAMERA

Next I took a look at the head. Again, nothing surprising, just nice and clean.

OLYMPUS DIGITAL CAMERA OLYMPUS DIGITAL CAMERAOLYMPUS DIGITAL CAMERA

The exhaust ports are looking much clearer:

OLYMPUS DIGITAL CAMERA

As are the inlet ports but they weren’t bad to start off with:

OLYMPUS DIGITAL CAMERA

And onto the face. The chambers have cleaned up well. Also the bit of the head that always gets a close shave!

OLYMPUS DIGITAL CAMERA OLYMPUS DIGITAL CAMERA

With the inspection of Paul’s handiwork done (think I was more interested in how clean stuff was!), I popped the block back on the workmate, masked it up then applied the primer. I’m using VHT Engine Enamel paints as opposed to the POR15 stuff from last time. This is simply due to the colour range and the fact that they’re aerosols rather than brush on. I’ve got the 3 stages – primer, colour and clear coat.

The primer is easy to apply with good coverage. Coat 1 should be a light coat:

OLYMPUS DIGITAL CAMERA

10 minutes later, another light coat:

OLYMPUS DIGITAL CAMERA

And 10 minutes after that a ‘medium wet’ coat:

OLYMPUS DIGITAL CAMERA

After giving this an hour to dry, it was on with the colour. I’m going for grey rather than black this time as seeing other engines, I think I prefer it. I’ve got ‘Ford Gray’ which is slightly darker than the primer, I’d call it a medium dark grey. The camera shows it a bit lighter than it is. I’d say it’s halfway between what I’d want it to be, and what the camera is showing it as.

Here it is after 2 light coats:

OLYMPUS DIGITAL CAMERA

And after the 3rd coat:

OLYMPUS DIGITAL CAMERA

After 30 minutes drying time I applied the clearcoat. This is applied the same way – 2 light coats and a medium wet coat, 10 minutes apart.

And the end result:

OLYMPUS DIGITAL CAMERA

Not massively different to when the primer was finished! It takes 3 hours to dry before handling, so that will do for today. Hopefully I’ll be able to get the head done tomorrow, maybe even the rocker cover if the weather holds out.

Lastly, whilst I was waiting for coats to dry I did a bit of meddling in the garage. Nothing major, just removed the thermostat housing and water pump inlet from the old engine. I also took a look at the alternator as I’d like to dismantle, clean and paint it. Removing the pulley nut now that it is off the car could be tricky though. I happened to look at the bottom bolt for it and noticed the thread was in a pretty poor state. That explains why it kept coming loose then!

OLYMPUS DIGITAL CAMERA

Posted in Performance upgrades | Leave a comment

GSXR Throttle Bodies Stripdown

Bit of an anti-climax this job after removing the engine, but something else ticked off either way.

OLYMPUS DIGITAL CAMERA

So that’s the throttle bodies in all their assembled glory. I started by removing the fuel rail and injectors. I’ll be using the standard MX5 injectors in the head. All the screws were undone without complaint apart from one, which just rounded off after looking at it the wrong way. That little problem was drilled out.

OLYMPUS DIGITAL CAMERA

Then I removed some of the pipework leaving a relatively clean set of throttle bodies.

OLYMPUS DIGITAL CAMERA

The motor for the second set of throttle butterflies came off without argument, though one of the screws on the bracket went the same way as that of the fuel rail, and was also despatched with the drill. Removing the second set of butterflies themselves was next.

These are held on with tiny screws, but instead of being made of soft cheese, were apparently made of concrete. Indeed, the screwdriver that I found was the right size soon surrendered, leaving it’s head in one of the screws. All eight of them would get drilled out then… some more successfully than others but I didn’t photograph the bad ones!

OLYMPUS DIGITAL CAMERA

With the plates removed, the spindle was just held in by a couple of circlips. I removed the first:

OLYMPUS DIGITAL CAMERA

Then removed the two bolts holding the two sets of throttle bodies together. Sliding the first set off allowed me to see the other circlip.

OLYMPUS DIGITAL CAMERA

With that removed, I had two pairs of throttle bodies ready for spacing.

OLYMPUS DIGITAL CAMERA

Spacing looks like it will be a relatively simple affair. Just need a spacer and longer bolts to keep the distance between the two, then something to relink the two throttle spindles.

Of course, they now have many more holes in them than I need. For the most part, I think I’ll tap them and fit some bolts cut down to size. This seems more secure to me than using chemical metal or similar.

I’ll pick up the block and head next weekend, so in the meantime I need to work out what else I need to do before rebuilding the engine. Ordering a shed load of gaskets is one thing I guess!

Posted in Performance upgrades | Leave a comment

Out with the old…

With the engine away for having the head and block refaced, it was time to bite the bullet and remove the current engine. Definitely committed to this project now!

Firstly, I removed the bonnet. Not a particularly light thing with the headlights still attached… I’m wondering if it’s heavier than the normal bonnet/nosecone. Theoretically not I guess. Anyway, with the bonnet removed, access is great.

OLYMPUS DIGITAL CAMERA

I can’t wait to lose a lot of these wires and hoses! I started at the front, and removed the air filter whilst the coolant was draining.

OLYMPUS DIGITAL CAMERA

The catch tank was next, then onto the exhaust. The silencer/link pipe took some persuading to let the manifold go – that was one part of the car that wasn’t going to fall off then at least.

OLYMPUS DIGITAL CAMERA

Finally, all the other little bits like the alternator, starter motor, engine mounts, fuel lines etc. When I refit the replacement engine, I’m definitely doing the inlet manifold last! It would have made life a lot easier if I’d removed the inlet manifold from this engine.

Ah well, it was eventually ready for removal and lifted out relatively easily. Getting it clear of the car wasn’t so easy though as I ran out of room to pull the engine crane backwards. I could have pulled the crane to the side a bit which would have done the trick, but the legs wouldn’t go under the wheel. Doh! Of course, I couldn’t undo the wheel because I hadn’t loosened the nuts off. So, strap the gearbox up (the jack was holding it up and I needed that), off the axle stands, loosen the nuts and back onto the axle stands. Wheel removed and I had all the space I needed.

I really need to make a new loom - far more wires there than required!

I really need to make a new loom – far more wires there than required!

Before I could bolt the engine to the engine stand I needed to remove the flywheel. When I removed the clutch it looked like the spigot bearing was leaking again.

Spigot bearing

It’s different colour to last time though (pictured below) and the bearing is still smooth. It could well just be oil from the rear crank seal (which is weeping). Might as well replace it though, just in case.

Flywheel

I encountered a problem when trying to remove the flywheel bolts… securing the flywheel whilst the engine is in free air just doesn’t work spectacularly well. A quick call to Stuart and he was round with his impact gun which did the job without struggling. I definitely have to invest in one of those. I usually borrow my brother’s air one but in this case an electric one seems much more suited to the garage.

The engine was attached to the standard and is now ready to have the bits I need removing from it.

Posted in Performance upgrades | Leave a comment